Turn off and unplug your Mirage. Check it again to make sure it is unplugged. Even minor 110v shocks cause discomfort and may cause you to inexplicably begin humming Carpenter's tunes, even if you are too young to have suffered through Richard and Karen. You've been warned.
Rackmount: Remove the top cover by removing the five screws on the top panel. Lift off the top and you should see the old drive in the front right-hand corner.
Disconnect the ribbon cable connector and the power connector. The drive is held to the Mirage frame by four screws through a bracket attached to the bottom of the chassis. Remove the bracket from the frame, exposing the four screws that hold the drive to the bracket. Remove those screws and the drive should come free.
Keyboard: The DSKs are more complicated to get into. See Art Entlich's article. It includes diagrams of how to disassemble the DSK case and how to get to the drive.
Before You Install The New Drive
Most drives have jumpers which determine the drive specification (i.e., drive A, drive B, etc.) The Mirage specifies the drive as drive 0. Some drives are pre-configured to be drive 0, others are set with jumpers. These jumpers are marked D0, D1, D2, etc. Set this jumper to D0. If this is not done, the drive will not respond at all and you will see a flashing "ND" in the Mirage's display.
Some models may have other jumpers as well. If the drive is not responding properly, you should make a drawing of the original settings of the jumpers. Then, experiment with different settings until you find the one that will work. (There's usually only two or three choices unless it's one of those hardware-defined models. If so, get a spec sheet from the manufacturer's tech support.) I asked Teac specifically how to configure their drive as a 720k high-density drive and they faxed back a diagram and spec sheet with jumper positions marked on it.
Installing The New Drive
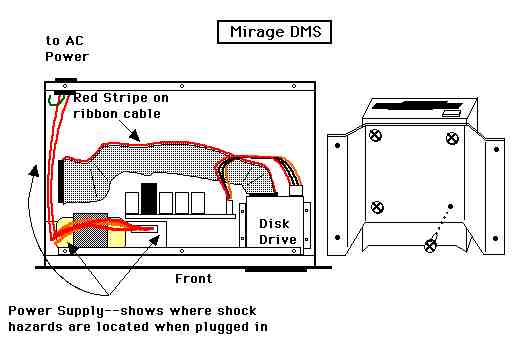
Installation is simple: plug the ribbon cable and the power supply back in the same direction they came out. You did make a diagram of the orientation of the connectors, didn't you? If not, don't worry: the power supply should only plug in one direction (red wire to the inside) and the ribbon cable should be configured with the red stripe on the cable pointed towards the power connector. Check that you haven't dislodged the other end of the cable from its connector. Set the disk drive in the case so its flywheel can move freely, but do not fasten the bracket back yet.
Test the drive with known good disks. If it works properly, reattach the drive bracket to the frame and close up the Mirage. It's a good idea to give the drive a good cleaning with a cloth disk cleaner soaked with denatured alcohol. If it has been sitting around in storage for a while, dust may be on the drive heads.
Troubleshooting
| Symptom | Possible Cause |
| Display flashing "ND" | Jumper not set to D0 |
| Disk drive runs non-stop | Ribbon cable not oriented properly |
| Drive loads OS, but not sample | Drive not configured for 720k |
| Drive loads only 1 or 2 tracks | Drive not configured for 720k |
| Drive seems to configured properly,
but won't load anything |
Bad disk; Bad drive; Bad ribbon cable;
Drive heads dirty. |
Finally...
If you have success replacing your drive, take the time to post a message to the Mirage-Net detailing what model number you got to work and any special procedures you had to perform. I will add any submissions to the working list (as my schedule permits!)
If you have problems, post a question to the Mirage-Net.
There's bound to be someone who has encountered the same difficulty.
Good luck!
Back to first page of Article Back to Mirage-Net